


This walkthrough illustrates how you can publish a Microsoft Dynamics NAV page as an OData web service, use it in a Visual Studio console application, and change data in Microsoft Dynamics NAV through the web service.
 About This Walkthrough
This walkthrough provides an overview of how to expose a page as a web service and how to use the web service in a C# console application. The walkthrough illustrates the following tasks:
-
Publishing a Microsoft Dynamics NAV page as a web service.
-
Verifying web service availability from a browser.
-
Adding the published web service as a service reference in a console application that you create in Visual Studio.
-
Changing the data in the console application.
Prerequisites
To complete this walkthrough, you will need:
-
Microsoft Dynamics NAV 2017 with a developer license.
-
CRONUS International Ltd. demonstration database.
-
Visual Studio 2012 or Visual Studio 2010. You can use any edition of Visual Studio that supports adding web references. In this walkthrough, you will use Visual Studio 2012. You also have the option to use service references instead of web references, or use the web service proxy generating tools svcutil.exe and wsdl.exe, which are included in the Microsoft .NET Framework SDK.
Publishing a Page as a Web Service
You publish a web service by using the Microsoft Dynamics NAV Windows client or the Microsoft Dynamics NAV Web client.
To register and publish a page as a web service
Open the RoleTailored client and connect to the CRONUS International Ltd. company.
In the Search box, enter Web services, and then choose the related link.
In the Web Services page, on the Home tab, choose New.
In the Object Type column, select Page. In the Object ID column, enter 21, and in the Service Name column, enter Customer.
Select the check box in the Published column.
Choose the OK button.
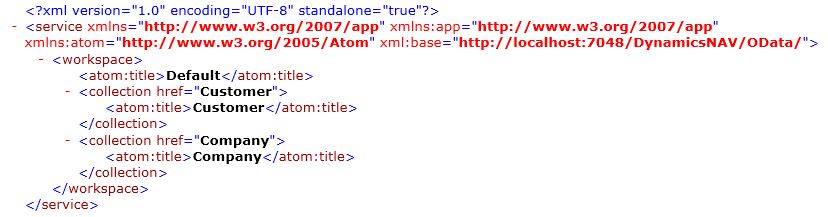
Verifying Web Service Availability
 Note Note |
|---|
| After publishing a web service, verify that the port that web service applications will use to connect to your web service is open. The default port for OData web services is 7048. You can configure this value by using the Microsoft Dynamics NAV Server Administration Tool. |
To verify availability of a Microsoft Dynamics NAV web service
Start Internet Explorer.
In the Address field, enter a URI in this format: http://<Server>:<WebServicePort>/<ServerInstance>/OData. For example:
http://localhost:7048/DynamicsNAV/OData
- Server is the name of the computer that is running Microsoft Dynamics NAV Server.
- WebServicePort is the port that OData is running on. The default port is 7048.
ServiceInstance is the name of the Microsoft Dynamics NAV Server instance for your solution. The default name is DynamicsNAV90.
For example, if the Microsoft Dynamics NAV Server is running on the computer that you are working on, then you can use: http://localhost:7048/DynamicsNAV/OData/
The browser should now show the web service that you have published, in the format of an AtomPub document.
- Server is the name of the computer that is running Microsoft Dynamics NAV Server.
Creating the Console Application
Next, you create a C# console application in Visual Studio 2012.
To create the C# project
In Visual Studio, on the File menu, point to New, and then choose Project.
Expand the Installed node, expand the Templates node, expand the Visual C# node, chose Windows, and then choose Console Application. Enter the name NAVCustomers for the application.
Choose the OK button to exit the New Project page.
In the Solution Explorer pane, right-click References, and then choose Add Service Reference.
In the Address field, enter the URI for your OData web service, such as http://localhost:7048/DynamicsNAV/OData/.
 Security Note
 In this example, we use the HTTP protocol to illustrate the use of OData web services. We recommend that you use the more secure HTTPS protocol when you consume web services. Choose Go, and then, in the Services field, choose NAV, and then choose the OK button.
The project is created, and your OData web service is added as a service reference. Next, you add the code that will show a list of existing customers, add a customer and then rename the new customer.
To add code to your console application
Add the following
usingstatement after the namespaces that are automatically added to your project: Copy Code
using NAVCustomers.ServiceReference1;
After the
Mainmethod, add the following method:Copy Codeprivate static void PrintCustomersCalledCust(NAV nav) { var customers = from c in nav.Customer where c.Name.StartsWith("Cust") select c; Boolean customerFound = false; foreach (Customer customer in customers) { customerFound = true; Console.WriteLine("No.: {0} Name: {1}", customer.No, customer.Name); } if (!customerFound) { Console.WriteLine("There are no customers that start with 'Cust'."); } }The
PrintCustomersCalledCustmethod reads the OData web service that you created, Customer, and creates a list of customers where the customer name begins with the letters Cust. Next, you add code to the Main method that uses the web service to write to Microsoft Dynamics NAV.In the
Mainmethod, add the following code to establish the connection to Microsoft Dynamics NAV through the web service:Copy CodeNAV nav = new NAV(new Uri("http://localhost:7048/DynamicsNAV/OData/Company('CRONUS%20International%20Ltd.')")); nav.Credentials = CredentialCache.DefaultNetworkCredentials;In the example, the name of the Microsoft Dynamics NAV company that you modify data for is CRONUS International Ltd.. You must replace this with the name of the company that you have access to. To find the correct URI, you can paste the following URI into your browser and then see the exact URI that you must use:
http://localhost:7048/DynamicsNAV/OData/Company.Add the following code to the method:
Copy CodeConsole.WriteLine("Printing list of current customers:"); PrintCustomersCalledCust(nav); Console.WriteLine("Adding new customer."); Customer newCustomer = new Customer(); newCustomer.Name = "Customer Name"; nav.AddToCustomer(newCustomer); nav.SaveChanges(); Console.WriteLine("Printing list of current customers:"); PrintCustomersCalledCust(nav); newCustomer.Name += "Changed"; nav.UpdateObject(newCustomer); nav.SaveChanges(); Console.WriteLine("Printing list of current customers:"); PrintCustomersCalledCust(nav);In this code, a customer is created and then renamed. The code prints a list of the customers that currently exist in the Customer table when each change has been made.
Build and run the project.
To verify the inserted and modified data in Microsoft Dynamics NAV
Open the Microsoft Dynamics NAV Windows client or the Microsoft Dynamics NAV Web client.
Open the list of customers, filter for a customer with the name Customer NameChanged.
This is the customer that the console application created and modified.
Next Steps
You have built a console application that uses an OData web service to modify Microsoft Dynamics NAV data. You can use similar OData web services in other applications when you want to allow users to modify data outside Microsoft Dynamics NAV.